Harness the Combinatoric Power of Command-Line Tools and Utilities
Create a Local Coding Environment with Ollama and OpenCode
Published August 1, 2026
Introduction
OpenCode is an open-source terminal-based coding agent. It’s an interactive interface that connects a large language model to your codebase and gives it tools to read files, run commands, and make edits on your behalf.
What You Need
To complete this tutorial, you need Ollama installed. Follow Run LLMs Locally with Ollama to set that up.
Installing OpenCode
Install OpenCode using the official installation script:
curl -fsSL https://opencode.ai/install | bashThe installation script downloads OpenCode and displays a message upon completion:
█▀▀█ █▀▀█ █▀▀█ █▀▀▄ █▀▀▀ █▀▀█ █▀▀█ █▀▀█
█░░█ █░░█ █▀▀▀ █░░█ █░░░ █░░█ █░░█ █▀▀▀
▀▀▀▀ █▀▀▀ ▀▀▀▀ ▀  ▀ ▀▀▀▀ ▀▀▀▀ ▀▀▀▀ ▀▀▀▀


OpenCode includes free models, to start:

cd <project>  # Open directory
opencode      # Run command

For more information visit https://opencode.ai/docs
The script attempts to place opencode’s binary on your PATH. On Linux and macOS, you’ll find it in ~/.opencode/bin/opencode.
Open a new terminal window and run the following command to verify that the opencode binary is available:
which opencodeIf you get no reply, modify your path to include ~/.opencode/bin/opencode.
Create a new project directory:
mkdir testproject && cd testprojectThen launch OpenCode:
opencodeOpenCode displays its interface, and it defaults to a cloud-based model you can use for free:
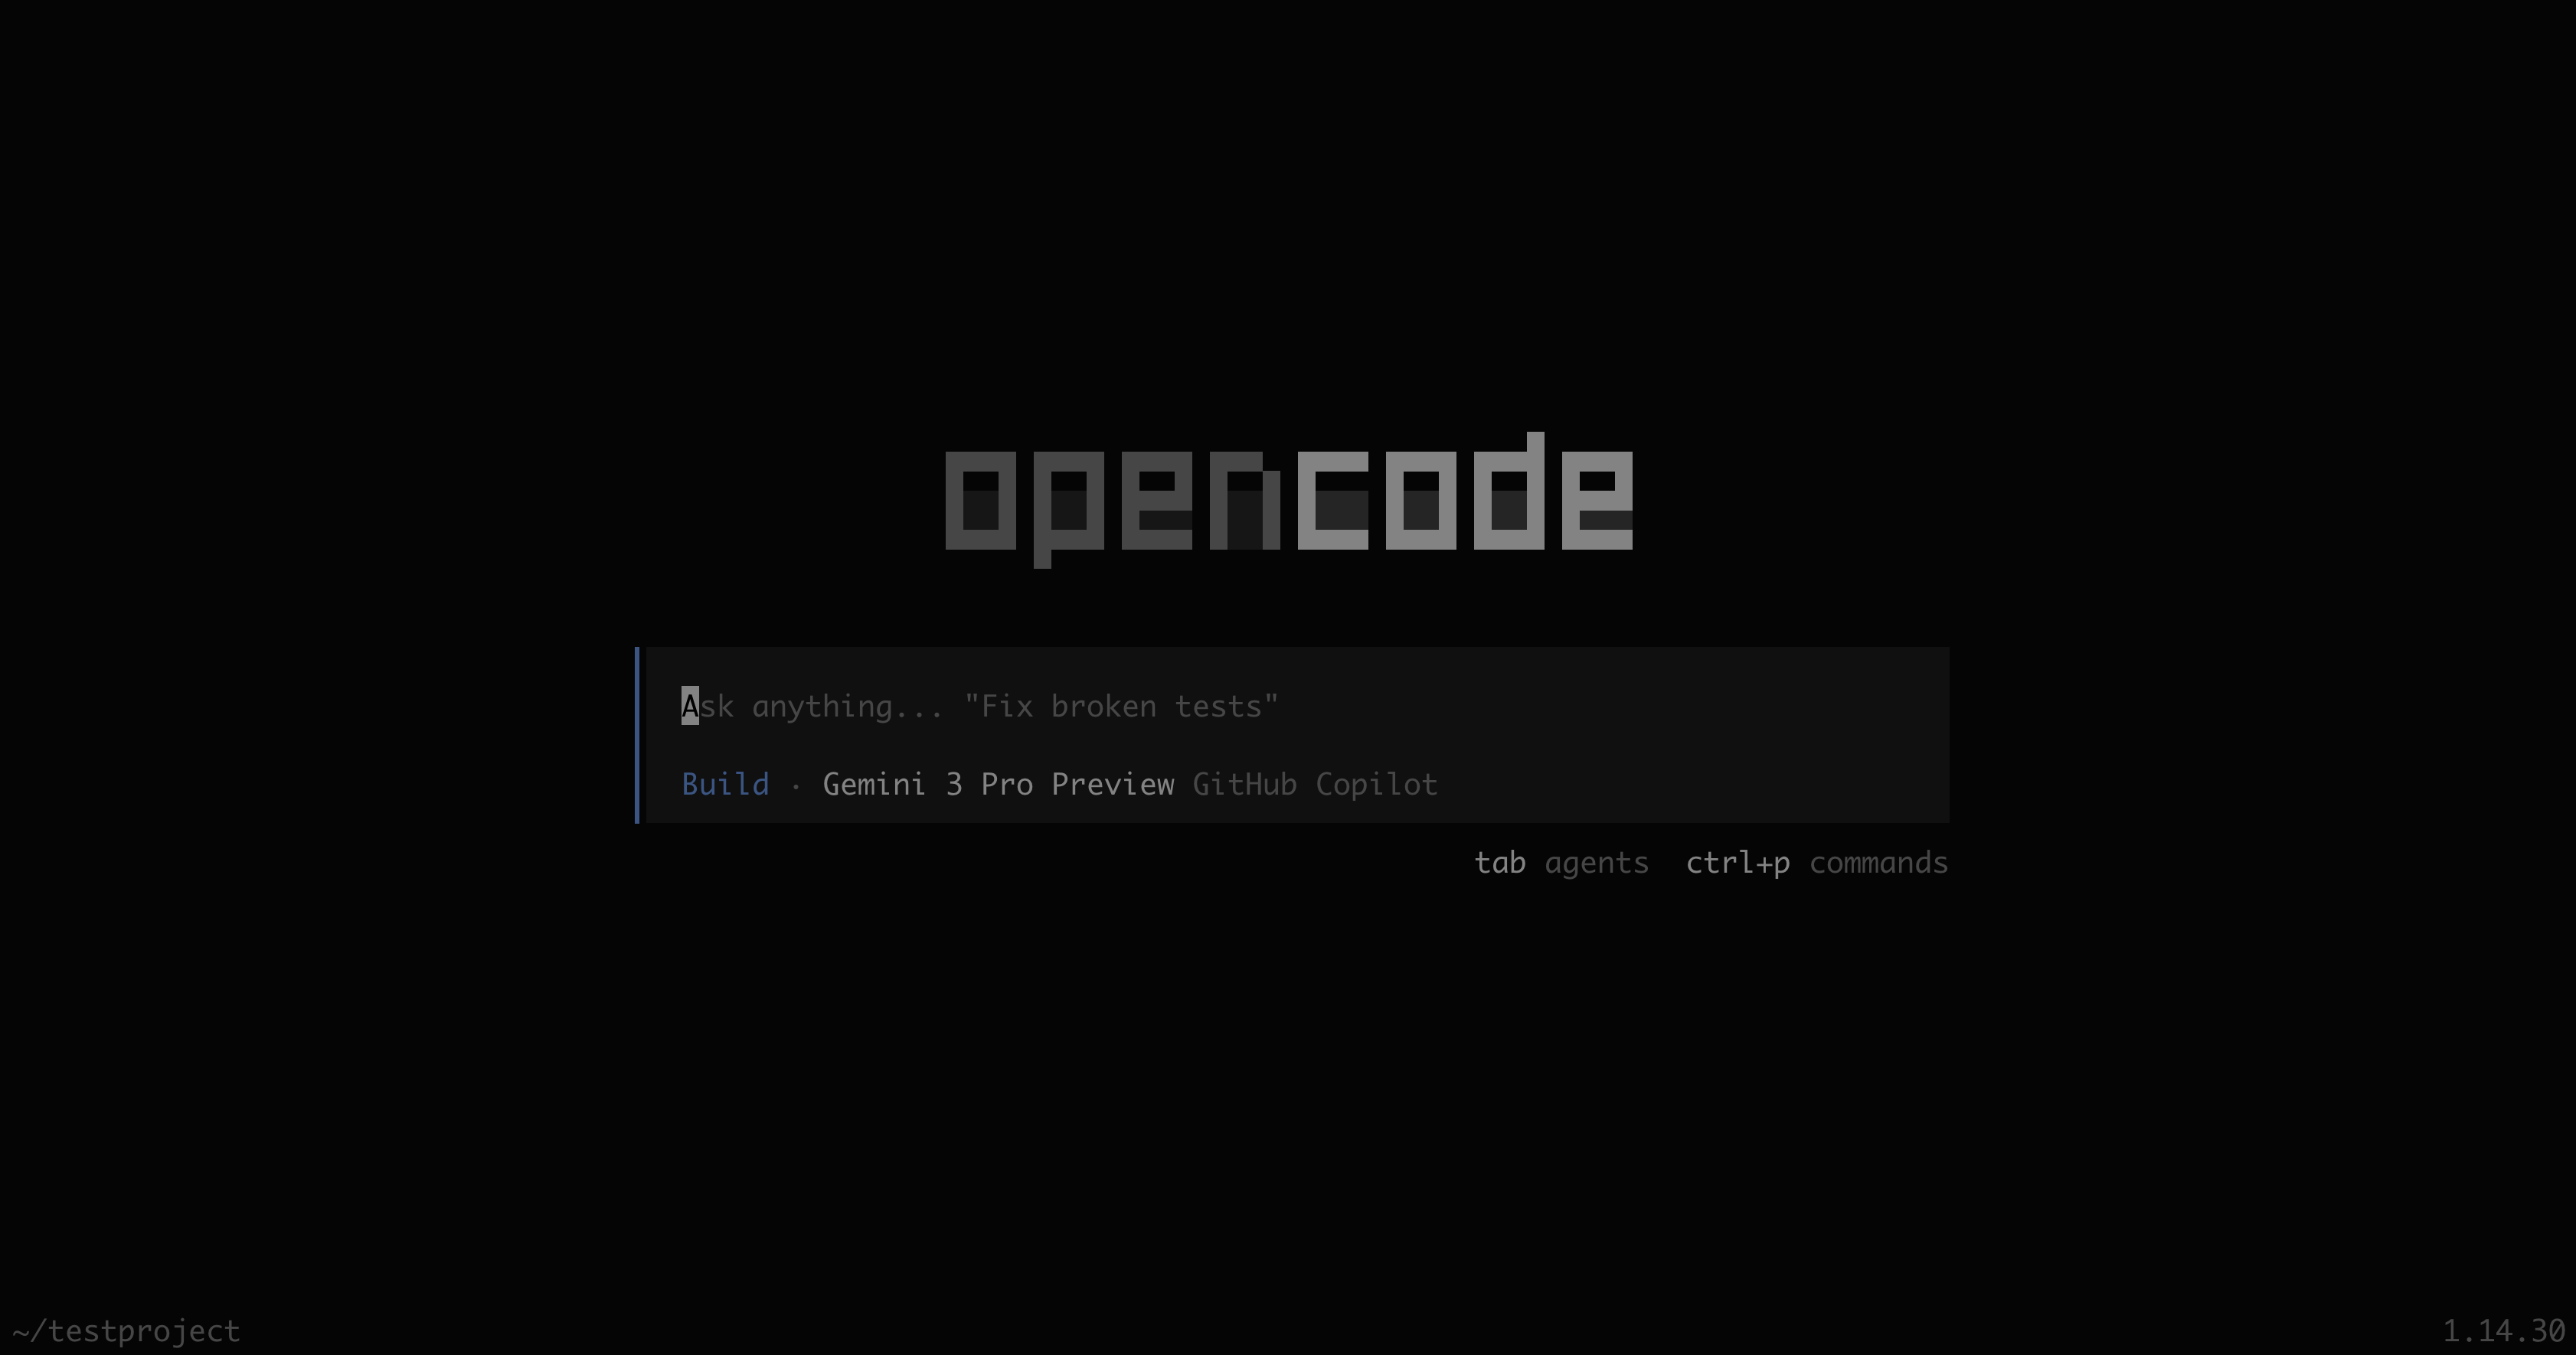
By default, OpenCode allows dangerous actions like writing files on the file system. If you’re used to Claude Code, which defaults to asking permission first, this will catch you off guard.
Press CTRL+D to quit OpenCode.
Create the file ~/.config/opencode/opencode.json and add the following code to configure default permissions:
{
  "$schema": "https://opencode.ai/config.json",
  "permission": {
    "read": "allow",
    "write": "ask",
    "edit": "ask",
    "bash": "ask"
  }
}
This tells OpenCode to ask permission to write and edit files, but allows reading them. It also asks permission to run Bash commands. Change these to suit your needs.
Next, you’ll use Ollama to get a coding model and configure OpenCode to talk to it.
Get and Configure a Coding model with Ollama
First, fetch a model trained on coding data. Many models have “coding variants” that have been trained on far more code, debugging conversations, and tool-use examples, and those perform better in agent workflows like OpenCode.
Use Ollama to download and run the qwen3-coder model. This is an 18GB model, but your machine needs 32GB of unified memory to be useful, and 48+ GB to run at the contexts that make it worthwhile for coding work. A 32GB Mac will work with a small context window. Coding models require significantly more resources to run locally than other models.
ollama run qwen3-coderIn another Terminal window, run ollama ps to review how the model is running:
NAME                  ID              SIZE     PROCESSOR    CONTEXT    UNTIL
qwen3-coder:latest    06c1097efce0    18 GB    100% GPU     4096       4 minutes from now
In this example, the model runs entirely on the GPU, but it has a small context window. The context window is the maximum amount of text (measured in tokens) the model can hold in memory at once, including your prompt, the conversation history, any files or code you’ve shared, and the model’s own response.
Ollama sets the context window either by a slider in the settings of the desktop app, or by using an environment variable, or by using a default calculation. You can set the context window multiple ways, but the most consistent way is to use Ollama to create a variant of the model with the context baked in. Ollama uses a method similar to Docker, so this new variant you’ll create won’t take up extra disk space; it’s another layer on top of the existing model.
Your context window has to fit alongside the model’s weights in your machine’s memory, so the right value is whatever leaves headroom for the OS and the apps you actually use.
As a rough guide, if the model fits comfortably in roughly half your available memory, you can usually push to its architectural max. If it’s eating two-thirds or more, stick to 32k or 64k and let the rest breathe. A 16 GB machine running a 10 GB model is in tight quarters and should treat 16k as the practical ceiling. A 64 GB machine running the same model can comfortably run at 128k.
Coding agents need at least 64k of context to be useful. If your hardware can’t sustain that without spilling layers to the CPU, you’re better off with a smaller model at full context than a larger model that’s been clipped. Use ollama ps for the GPU/CPU split to verify this.
Within the Qwen3-coder Ollama session, run the following commands to create a new model called qwen3-coder:64k:
>>> /set parameter num_ctx 65536
>>> /save qwen3-coder:64k
>>> /bye
Now you have a qwen3-coder:64k model that always loads with 64k context, no matter what client calls it.
Run the new model:
ollama run qwen3-coder:64kIn another Terminal window, run the ollama ps command to verify the new context setting:
NAME               ID              SIZE     PROCESSOR    CONTEXT    UNTIL
qwen3-coder:64k    9b4c888d5300    25 GB    100% GPU     65536      4 minutes from now
You now have a local model you can use for coding. Now you need OpenCode to know how to use it.
Configure Ollama models in OpenCode
You can use Ollama models with OpenCode. Ollama has a built-in feature to launch OpenCode, but you’re going to configure OpenCode to talk to Ollama instead, because this will set you up to have more control over the configuration, and also help you understand how to use a different model provider like LMStudio in the future.
OpenCode talks to Ollama through Ollama’s OpenAI-compatible endpoint at http://localhost:11434/v1. To make a model available, you add a provider block to OpenCode’s config file and a matching auth entry to OpenCode’s auth.json file.
First, add the auth information: Edit the file ~/.local/share/opencode/auth.json and add the following entry for Ollama:
{
  "ollama": {
    "type": "api",
    "key": "ollama"
  }
}
Ollama doesn’t validate API keys, but OpenCode requires an entry before it will route requests. Any non-empty string works for key. If you leave this step out, OpenCode will show the provider in /models but fail on the first request.
Now you can add models to OpenCode’s list. To do that, you need the names of the models you want to add.
Run ollama list to get the names:
NAME                  ID              SIZE     MODIFIED
qwen3-coder:latest    06c1097efce0    20 GB    2 days ago
qwen3-coder:64k       a1b2c3d4e5f6    20 GB    1 hour ago
The NAME column is the string you need. Copy it exactly as you see it, including the tag after the colon. qwen3-coder:64k and qwen3-coder are different models as far as Ollama is concerned, and a mismatch produces a model not found error at request time, not at config-load time.
Edit ~/.config/opencode/opencode.json and add the qwen3-coder:64k model you created to the ollama provider section. Or add the Ollama provider section if it doesn’t exist:
{
  "$schema": "https://opencode.ai/config.json",
  "permission": {
    "read": "allow",
    "write": "ask",
    "edit": "ask",
    "bash": "ask"
  },
  "provider": {
    "ollama": {
      "npm": "@ai-sdk/openai-compatible",
      "name": "Ollama",
      "options": {
        "baseURL": "http://localhost:11434/v1"
      },
      "models": {
        "qwen3-coder:64k": {
          "name": "Qwen3 Coder (64k)",
          "limit": { "context": 65536, "output": 16384 }
        }
      }
    }
  }
}
Here’s what the keys mean:
provider.ollama: the provider ID. You choose this. It becomes the prefix in model selectors (ollama/qwen3-coder:64k) and must match the top-level key inauth.json.npm: the AI SDK adapter package. Use@ai-sdk/openai-compatiblefor Ollama, LM Studio, vLLM, and anything else that speaks the OpenAI API shape.name(provider-level): the display name in the OpenCode UI. Optional, but useful when you have multiple local providers.options.baseURL: where the API lives. For local Ollama, alwayshttp://localhost:11434/v1. The trailing/v1is required; without it, you’re hitting Ollama’s native API, not the OpenAI-compatible one.models: a map where each key is a model name from theollama listcommand, and each value is that model’s configuration.models.<id>.name: the display name for the model. Optional; defaults to the ID.models.<id>.limit: Tells OpenCode how much context and output the model supports so it can manage context pressure. Withoutlimit, OpenCode doesn’t know your model’s window and can’t warn you when you’re running out.
Qwen3-Coder is a coding model. Its job is generating code, sometimes whole files at a time, so a more generous output budget makes sense. An output limit of 16384 gives it room to write a substantial file at once.
Once you have your configurations in place, run OpenCode again and use the /models command. Your Ollama models will be available under the Ollama section in the list:
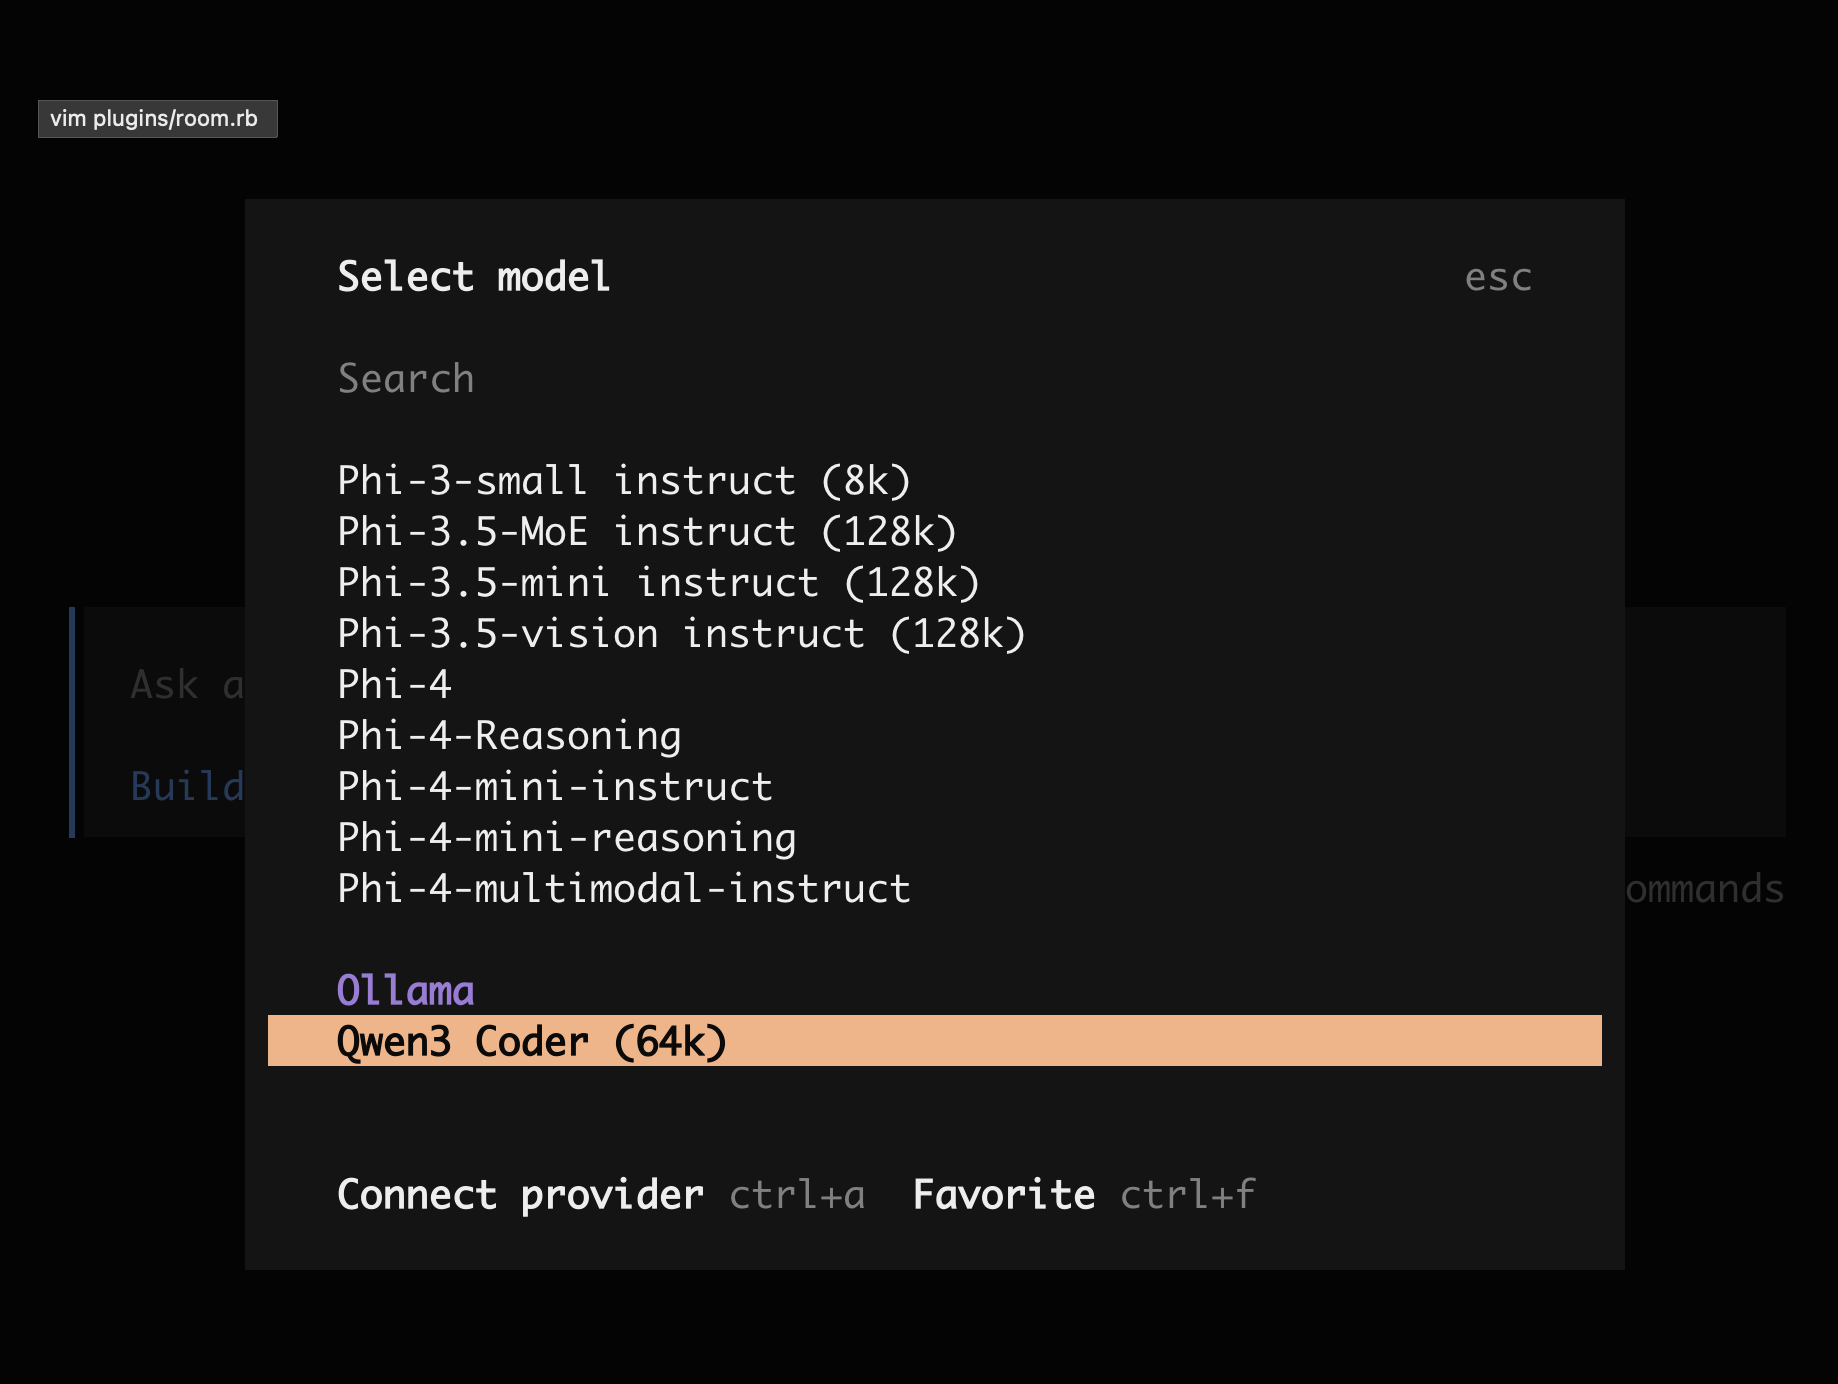
Select the Qwen3 Coder (64k) model from the list.
Now test it by building a small Node.js server.
Enter a prompt like this:
Create a basic "Hello World" HTTP server using node.js with a single endpoint at the root that returns a JSON response.
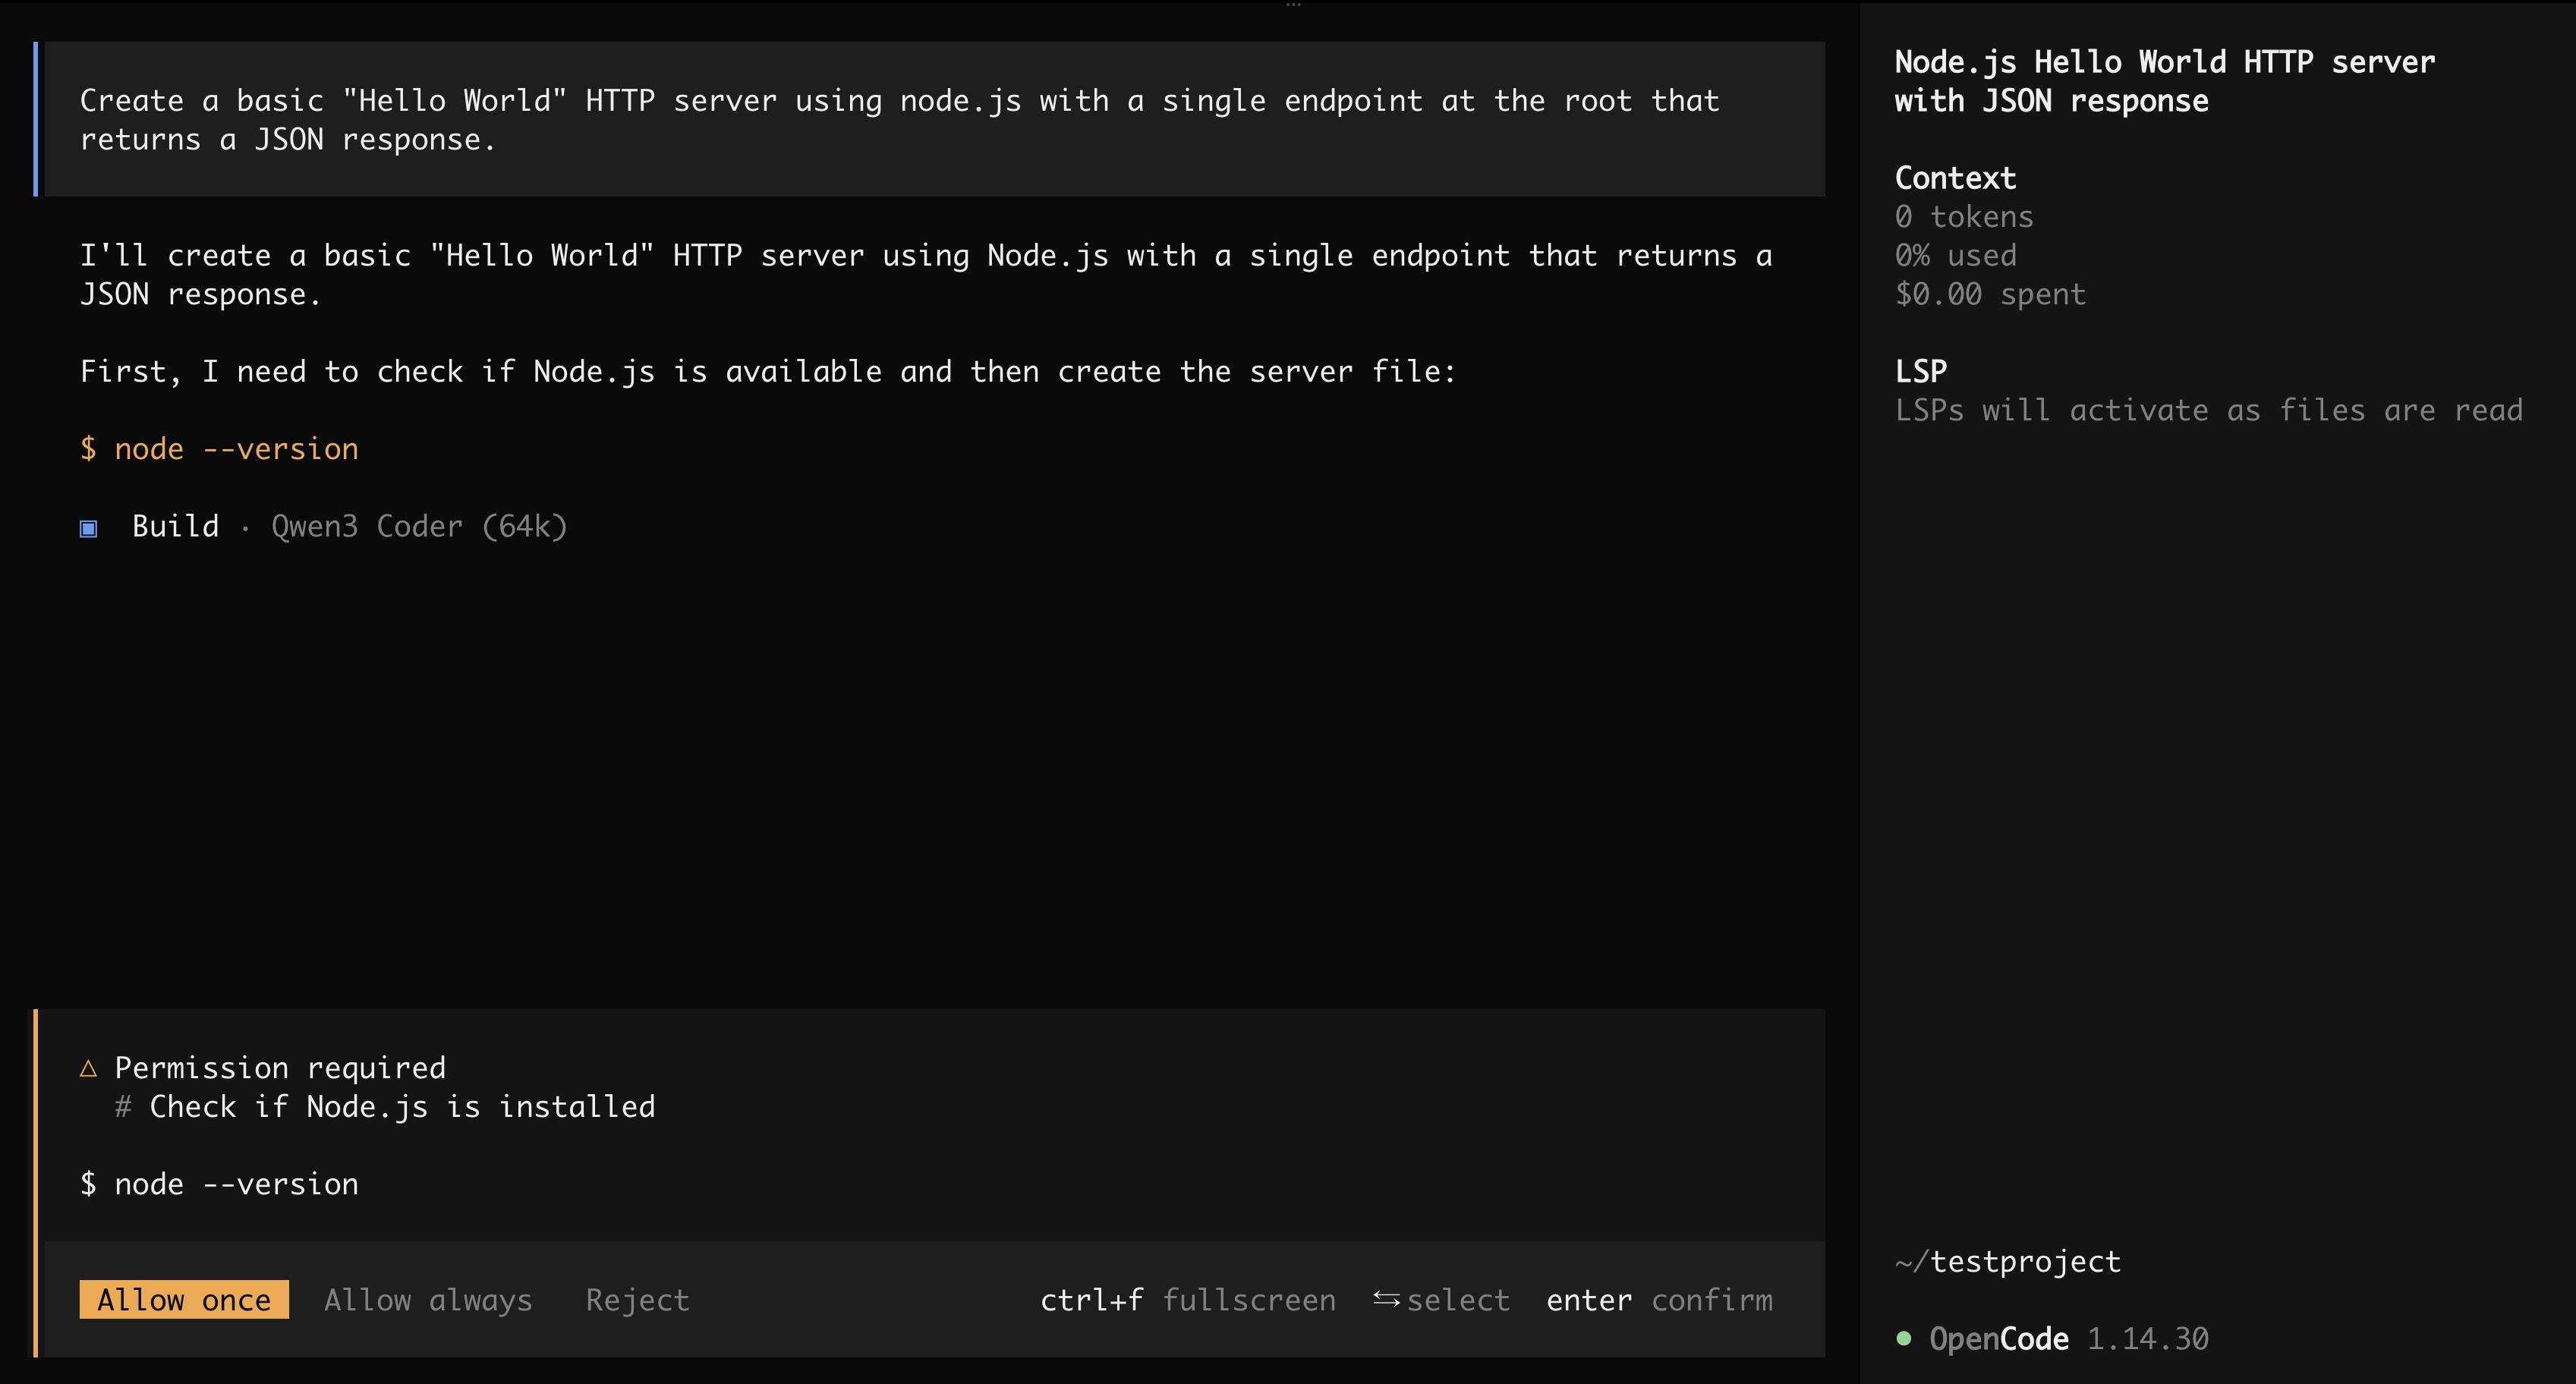
It confirms what you want to do and then checks to see if Node.js is installed. And because you set permissions earlier, it asks you if it can use Bash commands to check to see if Node is installed. You can choose to allow it once or always allow it. Allow the command to run.
Notice that the sidebar shows you the tokens used, along with the context size used. This is based on the limits you set in the model definition in the opencode.json configuration file.
OpenCode then takes a shot at writing this small program:
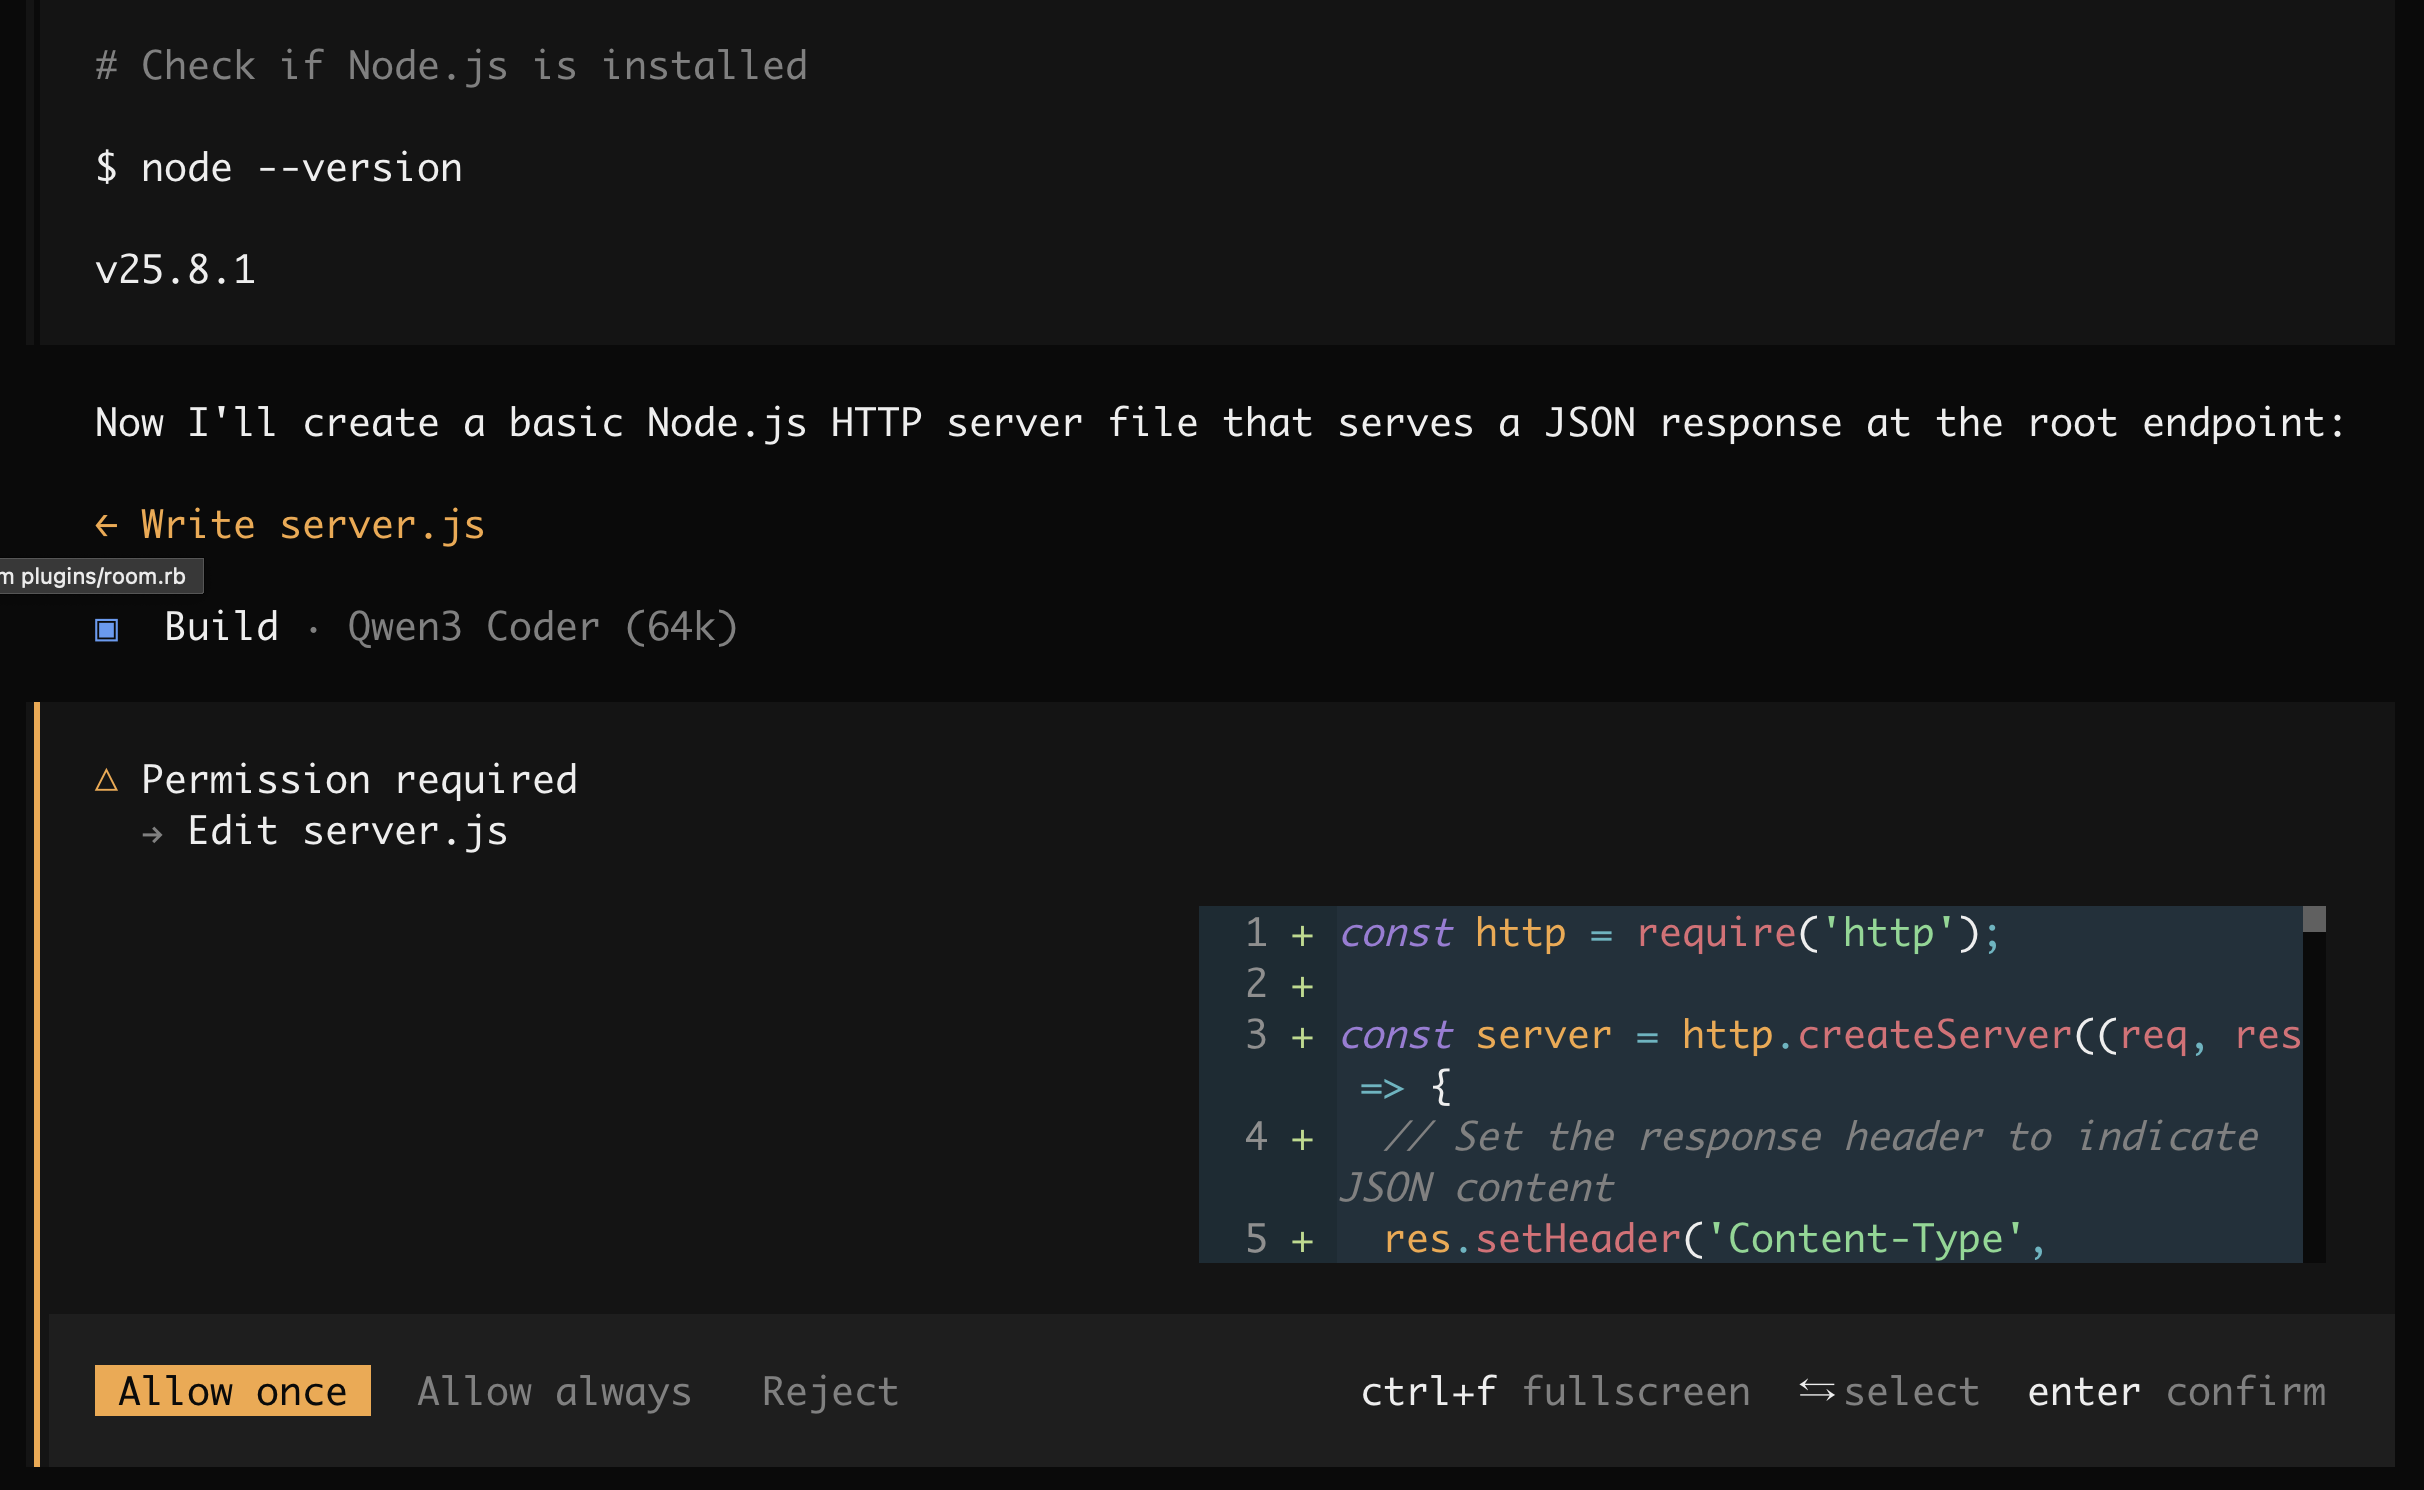
Again, because you told OpenCode it has to ask for permissions to write, it shows you what it wants to write so you can inspect it before you allow it.
Continue working with OpenCode until you have a working server.
When you’re done, use CTRL-D to quit OpenCode.
Conclusion
You now have a local LLM-driven coding environment that keeps all of your data on your machine. The performance you get depends on the hardware you use, but you can use this setup for smaller tasks or things that aren’t time-sensitive, which can ultimately reduce your monthly usage on the cloud platforms.